How to Cook Traditional-Style Pancakes on the Stovetop
Traditional-style stovetop pancakes become repeatable when the batter is measured, the pan is warmed gradually, and the first pancake is treated as information rather than as a verdict. Begin at the Pancake World Home Page, then use this plain flour, milk, egg, and butter formula to establish one reliable heat-and-portion setting for your own stove.

What traditional-style means in this method
This recipe makes ten medium pancakes for four people. It uses all-purpose flour, baking powder, a modest amount of sugar, milk, eggs, and melted butter. The intended pancake is tender rather than cakey, lightly sweet, evenly browned, and sturdy enough to turn without a thick dry rim. It is a practical stovetop style, not a historical claim that one formula represents every household or region.
Success is defined by observable endpoints: the batter falls in a thick ribbon, the test portion settles without racing outward, the edge becomes matte, opened bubbles appear toward the center, and the pancake releases as one supported piece. Use the first pancake to choose the pan setting, then repeat that condition instead of adjusting the whole bowl after every change in color.
Ingredients for ten medium pancakes
- all-purpose flour: 250 g
- baking powder: 10 g
- granulated sugar: 30 g
- fine salt: 4 g
- milk: 380 ml
- large eggs: 2 each
- melted unsalted butter: 40 g
- vanilla extract: 5 ml
- neutral oil or butter for the pan: 10 ml
Stovetop method with a first-pancake checkpoint
- Whisk flour, baking powder, sugar, and salt until evenly combined.
- Whisk milk, eggs, melted butter, and vanilla in a separate bowl.
- Fold wet into dry just until no dry flour remains, then rest for five minutes. (5 min)
- Cook one quarter-cup test pancake on a thin fat film over moderate heat and adjust only heat, portion, or one tablespoon of milk at a time. (4 min) The rim is matte, opened bubbles remain visible, the pancake releases, and the cut center has no glossy batter.
- Repeat with the successful scoop and heat, turning each pancake once. (20 min) Each pancake is lightly browned and springs back gently at the center.
Measure the batter before trying to control the pan
Weigh the flour if possible. A compacted cup adds dry material without announcing itself, which can lead to a stiff batter, a deep center, and an unnecessary splash of milk. When a scale is not available, follow the flour-measuring guide and level the cup gently. Whisk flour, baking powder, sugar, and salt until the small ingredients are evenly distributed.
Whisk milk, eggs, melted butter, and vanilla in a second bowl. The butter should be liquid but not hot enough to cook streaks of egg. Pour wet into dry and fold until the last dry flour disappears. Small soft lumps are acceptable. Scrape the bottom once and stop; a glossy perfectly smooth batter often reflects more mixing than a tender pancake needs.
Rest the bowl for five minutes while the pan warms. The batter should thicken slightly and fall from a quarter-cup scoop in a continuous ribbon. Do not add milk just because the rested batter looks fuller. The cooked test is the better measurement. If you want a deeper explanation of the stopping point, read the pancake-batter mixing method.
Set up the stovetop as a repeatable system
- Choose a flat skillet or griddle with enough room for the spatula to enter beside each pancake. A warped or sharply sloped pan moves batter and fat toward one area, making the first test difficult to interpret.
- Warm the empty pan gradually over medium-low to moderate heat rather than starting at the highest setting. Burners, pan materials, and pan thickness differ, so a numbered dial position is only a starting record, not a universal temperature.
- Apply a thin film of neutral oil or butter and wipe away a puddle. The guide to applying a thin, even fat film shows why a consistent surface is easier to read than an irregular layer that fries some edges and leaves other areas dry.
- Set out a quarter-cup scoop, a wide thin spatula, a plate or rack, and a small note for the first result. Keeping tools ready prevents the pancake from overcooking while you search for a turner or serving plate.
Correct the first pancake one variable at a time
| First-pancake result | Most useful interpretation | Next controlled test |
|---|---|---|
| The underside darkens before the rim sets. | The pan is delivering heat faster than the center can use it. | Lower heat slightly and repeat the same quarter-cup portion. |
| The pancake stays pale, sets slowly, and feels dry. | The pan may be too cool or the cooking time unnecessarily long. | Raise heat modestly and keep the batter and scoop unchanged. |
| The batter spreads into a very thin fragile round. | The bowl may be loose or the portion too large for the pan. | Use a smaller scoop before adding flour to the entire bowl. |
| The pancake remains a high mound with a pasty center. | The scoop is too deep or the batter may be stiff. | Reduce the scoop first; add one measured tablespoon of milk only if the smaller test remains stiff. |
| The pancake tears during the turn. | The first side is under-set, the tool lacks support, or the round is too wide. | Wait for a matte rim and slide the spatula under the center before changing ingredients. |
| The test is tender, set, and evenly colored. | The current heat, portion, and timing cues work together. | Repeat them for the next two pancakes before making any refinement. |
Cook by release, not by a timer alone
- Pour one quarter-cup portion onto the prepared pan and let it settle naturally. Do not press it thin or circle the scoop through the batter. A consistent depth makes the center and edge comparable from pancake to pancake.
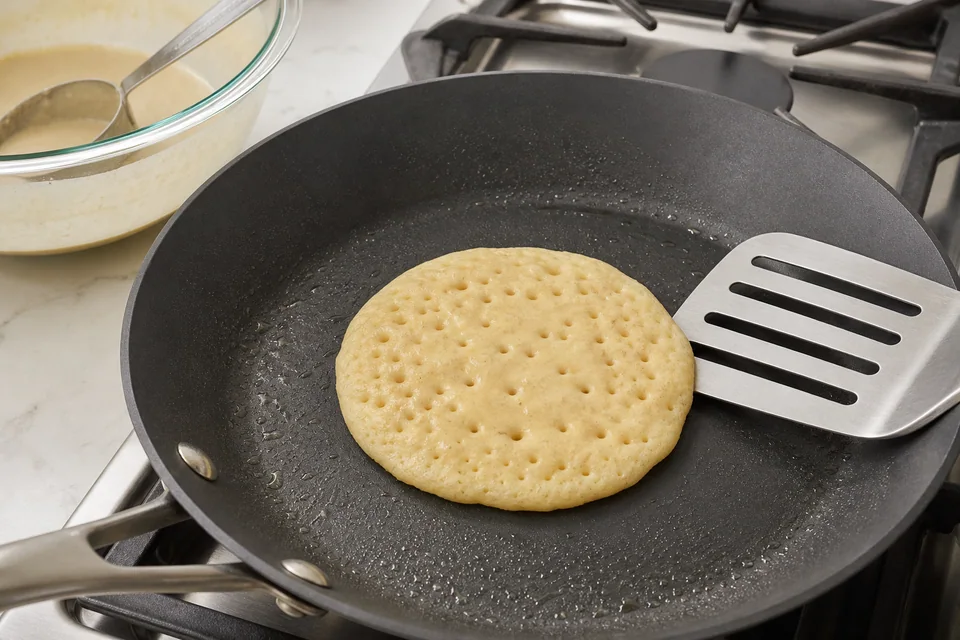
- Watch three signals together: the outer rim becomes matte, bubbles open and remain visible toward the center, and the spatula can move under the pancake without dragging wet batter. A single early bubble is not a turning command.
- Slide the spatula fully under the center and turn once with a low, confident motion. A high toss is unnecessary and increases the chance of folding the pancake. Do not press after turning; pressure releases gas and can make a properly mixed pancake dense.
- Cook the second side until lightly browned and the center springs back when touched gently. Cut the first successful pancake. A moist tender crumb is appropriate; a glossy line of batter is not. Use the cut result to confirm the visual signals you will follow for the batch.
- If one side of the same pan consistently colors faster, treat that as a surface pattern rather than a batter defect. Use the uneven-pan diagnosis to decide whether placement, rotation, or a smaller cooking zone will make the next portion more comparable.
Keep the tenth pancake connected to the first
Once the test succeeds, record four things: burner setting, portion volume, the point at which the rim became matte, and the way the pancake released. Repeat those conditions. Do not stir the bowl vigorously between scoops. If the batter settles, lift once from the bottom with the scoop; repeated whisking develops more structure and changes the very comparison you are trying to preserve.
Pan heat often accumulates across a batch. If later pancakes brown sooner at the same scoop, pause briefly or lower the setting before assuming the baking powder or sugar has changed. The guide to why later batches brown faster separates heat history from formula changes. Adjusting milk cannot cool an overheated pan.
Apply only enough fresh fat to restore a thin film. A dry-looking patch does not always require a full spoonful; excess fat can create crisp halos and blotchy color. Keep cooked pancakes in a loose single layer on a rack or overlap them lightly. A sealed stack traps steam and softens the surfaces before the meal begins.
For a double batch, double every ingredient by weight but keep the quarter-cup portion unchanged. Use a second bowl if the batter would wait through a long cooking session. Scaling the yield means repeating the successful unit; it does not mean doubling pancake diameter or crowding the skillet.
Recover without rebuilding the whole formula
Dense or heavy center
Make the next pancake smaller at the same heat. If the smaller center cooks tenderly, portion depth was involved. If it remains heavy, inspect mixing and baking powder before a new batch. Adding extra leavener to a fully mixed bowl is difficult to distribute evenly and can leave an unpleasant taste.
Dry, tall pancake
Verify the flour measurement and shorten cooking once the center is set. If the small correctly timed test is still dry, fold one tablespoon of milk into the remaining batter. Record that tablespoon and repeat the same scoop. An unmeasured splash can turn a stiff bowl into fragile batter without identifying the correction.
Sticky surface
Wait for the edge and center signals before forcing the spatula underneath. Restore a thin fat film and test a smaller pancake. If sticking continues, let the pan cool and inspect its surface. For cookware-specific technique, follow the stainless-steel pancake method when that is the pan in front of you.
Uneven flavor or texture from add-ins
Stop mixing additions through the main bowl. Place berries, chips, or nuts on individual portions after they reach the pan, using one plain pancake as the reference. Wet fruit and heavy pieces change local cooking and turning. The base recipe is easier to recover when the variation remains visible and limited.
Choose a serving variation after the base works
Butter and maple
Serve butter and maple syrup at the table so each pancake keeps its surface until it is eaten. A small pinch of salt on unsalted butter can sharpen contrast. Avoid pouring syrup over a batch that must wait, because the upper pancakes will soften while the lower ones absorb liquid.
Berry and yogurt
Use fresh berries as a topping or place a few on each raw pancake after portioning. Frozen berries release more water and can cool the local batter, so start with fewer and expect a longer set near the fruit. Spoon yogurt beside the stack rather than hiding the first pancake's center under a thick layer.
Apple and warm spice
Cook diced apple separately with a little butter and cinnamon until the pieces are tender but not swimming in liquid. This preserves the reference batter and gives a clear textural contrast. Adding raw grated apple to the whole bowl changes moisture and should be treated as a different formula.
Savory breakfast plate
Reduce the sugar in a future batch only after the reference method works, omit vanilla, and serve the pancakes with eggs, sautéed greens, or yogurt and herbs. Do not change sugar, liquid, and flour simultaneously. For more deliberate sweet and savory pairings, use the topping flavor guide.

What this traditional method does not promise
A burner dial is not a calibrated temperature, and a water-drop test is not a substitute for reading the pancake itself. Pan material, thickness, diameter, burner size, room conditions, flour absorption, and milk temperature all affect timing. This guide therefore uses relative heat and visible checkpoints rather than guaranteeing a minute or dial setting.
Dairy-free milk, gluten-free flour, egg replacers, buttermilk, whole-grain flour, and protein powder can each make useful pancakes, but none is an invisible one-for-one branch of this formula. Choose a dedicated method or run a small measured trial rather than changing several ingredients in the reference bowl. A successful variation should record what changed and how the first pancake responded.
Cool leftovers promptly and refrigerate them in a shallow covered container. Reheat only the amount you plan to serve, and keep wet toppings separate until after reheating. This is an original measured stovetop formula informed by published classic pancake methods; it makes no personal-test, historical-authenticity, or universal-temperature claim.
Your one next move
Measure the reference batter and cook one quarter-cup pancake in the center of the gradually warmed pan; record its color, release, and cut center before changing anything else.
Sources and editorial references
Original measured stovetop recipe and first-pancake decision workflow informed by cited classic pancake guidance; no personal-test, historical-authenticity, or universal-temperature claim.
- https://www.kingarthurbaking.com/recipes/simply-perfect-pancakes-recipe: https://www.kingarthurbaking.com/recipes/simply-perfect-pancakes-recipe
- https://www.kingarthurbaking.com/blog/2021/10/26/best-pancake-tips: https://www.kingarthurbaking.com/blog/2021/10/26/best-pancake-tips
- https://www.foodsafety.gov/people-at-risk: https://www.foodsafety.gov/people-at-risk