
Quick answer
To make dependable pancakes, measure the ingredients, combine the wet and dry mixtures separately, stir them together just until no dry flour remains, and let the batter stand while the pan finishes heating. Cook one small tester over moderate heat. Turn it when the lower edge looks set, the top has bubbles, and some bubbles leave open holes. Adjust either heat or batter thickness before cooking the rest.
This guide uses the familiar quick-leavened style represented by American pancakes. It is a starting method, not a rule for crêpes, fermented pancakes, egg-foam pancakes, or every gluten-free batter. Those styles need their own proportions and visual cues.
Equipment that makes the job easier
You need two bowls, a whisk, a flexible spatula, measuring tools, and a flat skillet or griddle. A digital scale improves repeatability because flour can settle differently in a cup. A ladle or measuring cup helps keep portions similar, which makes cooking times easier to compare.
Choose a spatula with a thin leading edge that can slide under most of a pancake. A small pan is workable, but a broad surface gives your hand room to turn the cake without catching its edge on the side. Nonstick, seasoned cast iron, and a well-managed steel griddle can all work; their warm-up times differ.
A straightforward ingredient pattern
For a modest batch, use 180 grams all-purpose flour, 2 teaspoons baking powder, 1 tablespoon sugar, and 1/2 teaspoon fine salt. Combine that with 240 millilitres milk, 1 large egg, 2 tablespoons melted butter or neutral oil, and 1 teaspoon vanilla if wanted.
The quantities describe a neutral-milk formula. Baking powder provides the leavening, so there is no need to add baking soda “for extra lift.” A buttermilk recipe may include soda because the liquid is acidic, but changing only the milk can disturb that balance. Follow a tested buttermilk formula when that is the style you want.
Flour gives the batter structure, the liquid hydrates it, egg helps it set, fat softens the texture and assists browning, and baking powder releases gas. Sugar adds sweetness and encourages colour. Knowing those jobs makes a failed tester easier to read than treating every ingredient as an interchangeable scoop.
Step 1: measure before heating
Set out every ingredient and read the list once from top to bottom. Weigh the flour into the larger bowl. If you have no scale, loosen it with a spoon, spoon it gently into the cup, and level the top; do not press the cup into the bag.
Measure baking powder and salt with level spoons. Too much leavener can create an unpleasant taste and a batter that rises before it has enough structure. Too little can leave the pancakes compact. Check that the baking powder is within its stated date and has been kept dry.
Melt the butter early enough that it is fluid but not fiercely hot when it meets the egg. A very hot fat can create cooked flecks. If the kitchen is cool and the butter begins to solidify, lukewarm milk helps it stay dispersed.
Step 2: combine dry and wet ingredients separately
Whisk the flour, baking powder, sugar, and salt until no concentrated patch of leavener remains. In the second bowl, whisk the milk, egg, melted butter, and vanilla until the egg white is fully broken up.
Separate mixing is a small act with a useful purpose. It spreads the leavener before water starts the reaction and lets you smooth the egg without repeatedly working the flour. Scrape the bottom of each bowl once to catch anything hiding there.
Step 3: mix briefly
Pour the wet mixture into the dry. Fold with a whisk or flexible spatula, sweeping across the bottom and turning the bowl. Stop when there is no pocket of loose flour. Small, soft lumps are acceptable; vigorous beating for a perfectly polished surface is unnecessary.
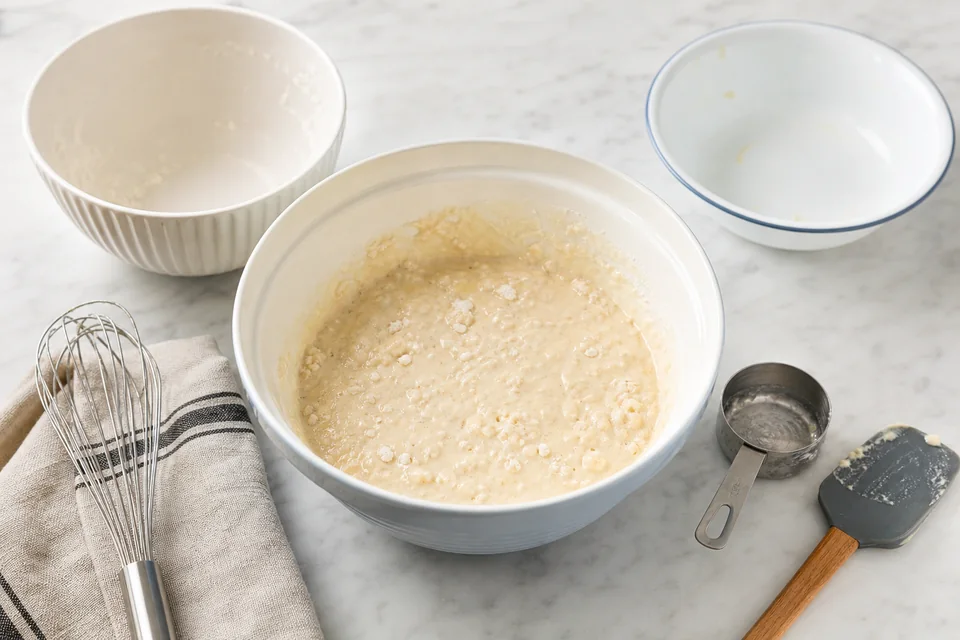
The batter should fall from a spoon in a broad, slow ribbon. It should spread after landing rather than sit like dough, yet it should not run like milk. Let it stand for about five to ten minutes while the pan preheats. The rest allows dry flour to hydrate and gives surface bubbles time to settle.
If the batter becomes extremely stiff, add milk one tablespoon at a time. If it races across the pan, whisk one tablespoon flour with a spoonful of batter in a small cup, then return that smooth paste to the bowl. Tiny measured corrections are safer than an unrecorded splash.
Step 4: preheat the cooking surface
Place the skillet over medium-low to medium heat and allow several minutes for the whole surface to warm. High heat produces a dark exterior before the centre can set. A pan that is still cool encourages spreading and a pale, dry first cake.
Brush on a thin film of neutral oil or clarified butter and wipe away any pool. Whole butter contributes flavour but its milk solids can darken as the batch continues. If you use it, watch the colour and clean the pan between rounds when browned residue accumulates.
Test the surface with a teaspoon of batter rather than a spray of water. The dab should begin to sizzle gently and set at the edge without scorching. This gives direct information about how the actual mixture behaves.
Step 5: cook one tester
Portion roughly 60 millilitres, or 1/4 cup, into the pan. Leave it alone while the first side builds enough structure to turn. Look for a matte band around the edge, bubbles across the top, and several holes that remain open instead of closing instantly.
Slide the spatula beneath the centre and lift one edge. A medium golden underside is a better cue than a timer alone. For a closer visual guide, see when to flip pancakes.
Turn with one low, decisive movement. Do not lift the pancake high and drop it; that throws batter and can fold the edge. The second side generally needs less time because the centre is already warm. Remove the pancake when the centre springs back lightly and no wet band is visible at the edge.
Step 6: read the result before continuing
Cut the tester through its thickest point. A cooked crumb should look set and moist, not shiny with raw batter. If the outside is dark while the inside is wet, lower the heat and make the next portion slightly smaller. If it is pale and dry after a long wait, increase the heat a little.
If the pancake spreads thin, let the batter stand another few minutes before changing it. Then use the small flour-paste correction if necessary. If it barely spreads and stays tall in the middle, add a tablespoon of milk. Record the change mentally so the following cake confirms whether it helped.
For repeated scorching, use the focused guide on how to stop burning pancakes. Heat retained by a heavy pan can keep rising after the dial changes, so allow time for an adjustment to take effect.
Step 7: cook the batch consistently
Use the same portion and leave enough space to reach each pancake with the spatula. On a large griddle, the first and last portions may reach their turning point at different moments. Place them in a simple order and turn them in that order.
Reapply only a light coating of fat when the surface looks dry. Thick pools fry the edges and create spotty colour. Wipe out dark crumbs because they will mark later cakes even when the heat is correct.
Avoid pressing a pancake after turning. Compression pushes out steam and cannot make the centre cook more evenly. A smaller portion or gentler heat solves an underdone middle more reliably.
Keeping pancakes warm
For immediate family service, place finished pancakes on a rack set over a sheet pan in a low oven. The rack lets steam escape so the bottoms do not become damp. Do not hold them longer than necessary; even gentle heat slowly dries the crumb.
If everyone can eat as the cakes leave the skillet, that is the best texture. Warm plates and prepared toppings make that practical. Serve fruit, yogurt, syrup, or softened butter at the table rather than delaying the batch while garnishes are assembled.
Common beginner problems
Dense pancakes most often point to thick batter, excess mixing, weak or mismatched leavener, or heat too low for the batter to set around its bubbles. Change one factor, not all four. A fresh measured batch is more informative than piling extra baking powder into a bowl whose proportions are already uncertain.
Irregular shapes usually come from inconsistent portions, a tilted pan, or batter that is too fluid. They are not a safety problem. Use a measuring cup and pour into the same area of a level surface before changing the recipe.
A pale top after turning is normal; the second face rarely looks identical to the first because the batter has already set. Judge the centre and flavour rather than chasing mirror-image colour.
Food-safety boundary
Raw flour is not ready-to-eat, and batter containing raw egg should not be tasted. Wash hands, utensils, and work surfaces after they contact the uncooked mixture. Keep raw batter away from toppings that will be served without further cooking.
Cook until the centre is set, but do not use surface darkness as the sole proof. If there is uncertainty, cut the tester and inspect the middle. The same method protects the rest of the batch without turning every pancake excessively dark.
Frequently asked questions
Must pancake batter be perfectly smooth?
No. Small soft lumps can remain in a conventional wheat batter. Dry flour pockets should be folded in, but extended whisking for cosmetic smoothness can make the texture tougher.
Why is the first pancake different?
The pan and its fat layer are still settling. Treat that cake as a measurement: inspect spread, colour, turning strength, and centre, make one adjustment, and then establish the rhythm for the batch.
Can I prepare the batter the night before?
This quick-leavened formula is designed to be mixed near cooking time. For a faster morning, weigh the dry mixture and refrigerate the combined wet ingredients separately, then bring them together shortly before the pan is ready.
Where should I start if several things went wrong?
Begin with the tester observations and use Pancake Troubleshooting to isolate heat, thickness, mixing, or leavening. A single, measured correction gives you evidence for the next pancake.
Sources and editorial references
- University of Tennessee Extension, “Flat As A Pancake” —
https://www.healthyfamilies.tennessee.edu/recipes/flat-as-a-pancake/ - Ohio State University Extension, “Favorite Pancakes” —
https://extension.oregonstate.edu/food/recipes/favorite-pancakes - King Arthur Baking, “How to Avoid Overmixing” —
https://www.kingarthurbaking.com/blog/2017/04/27/avoid-overmixing - U.S. Food and Drug Administration, “Handling Flour Safely: What You Need to Know” —
https://www.fda.gov/consumers/consumer-updates/handling-flour-safely-what-you-need-know - U.S. Department of Agriculture Food Safety and Inspection Service, “Shell Eggs from Farm to Table” —
https://www.fsis.usda.gov/food-safety/safe-food-handling-and-preparation/eggs/shell-eggs-farm-table
For more practical food and breakfast guides, visit Pancakes World.
For the wider topic, start with Guides/pancake Ingredients.
For a closely related guide, see Learn How to Make Pancakes.
A useful next comparison is Is cooking pancakes with butter a mistake?.
You can also continue with How to Make Buttermilk Pancakes.
