Cooking breakfast sausage
At Pancakes World, choose the cooking method by product state, batch size, and equipment: use a skillet for a few fresh patties or links and close control, an oven for a full sheet, an air fryer for a small batch when its manual permits sausage, or a grill when outdoor cooking and flare-up management are practical. Read the package before starting. Raw sausage made from ground pork, beef, veal, or lamb must reach 160°F; turkey or chicken sausage must reach 165°F. Insert the thermometer through the side of thin pieces so its sensing area reaches the centre. Colour and elapsed time cannot confirm safety.
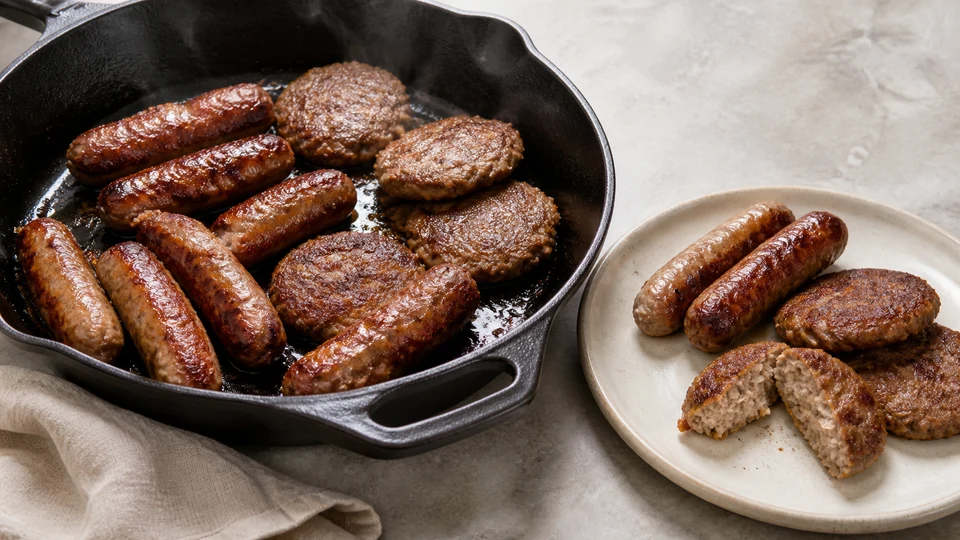
This guide compares methods rather than prescribing one universal clock. The breakfast hub covers other morning formats, and Pancake World connects the larger collection.
For broader context, continue with American Breakfast: Pancakes, Diner Plates and Brunch.
Direct answer: which cooking method should you use?
Use a skillet for one to six pieces, especially when you want to respond quickly to browning. Use the oven for a larger batch that fits in one uncrowded layer. Use an air fryer only when the appliance manual and sausage package support it; capacity is usually smaller and cooking can be fast. Use a grill for direct outdoor heat, but expect rapid exterior colour and verify the centre. Use a microwave only when the package provides validated instructions for that exact raw, partially cooked, or ready-to-eat product.
The method changes the workflow, not the safe endpoint. USDA FSIS specifies 160°F for uncooked sausage containing ground beef, pork, lamb, or veal and 165°F for ground turkey or chicken. A mixed sausage containing poultry should reach 165°F. Ready-to-eat sausage may need only product-directed heating, but the label—not its appearance—establishes that status.
Step one: identify what is in the package
Breakfast sausage can be sold as raw bulk meat, formed patties, small links, frozen patties, partially cooked links, or fully cooked ready-to-eat pieces. It can contain pork, beef, poultry, or a combination. The same brown exterior and small shape can appear across products with different instructions.
Before choosing a pan, read:
- the product name and meat species;
- “raw,” “uncooked,” “ready to cook,” “cook before eating,” or ready-to-eat wording;
- fresh, thawed, or frozen directions;
- the safe-handling statement;
- appliance-specific instructions;
- storage dates and refrigeration requirements.
USDA FSIS notes that partially cooked sausage can appear cooked while still requiring a consumer cooking step. Treat any product marked “cook before eating” as raw in the kitchen: keep it separate from ready-to-eat food, wash hands after handling it, and verify its internal temperature.
Do not infer meat species from colour. Turkey sausage can be seasoned to resemble pork; a pork-and-chicken blend needs the poultry endpoint. When the label is missing or unreadable, do not guess.
Method comparison
| Method | Good fit | Main control | Main limitation |
|---|---|---|---|
| Skillet | Small fresh batch | Heat and turning can be adjusted immediately | Requires attention and can splatter |
| Oven | One or two uncrowded sheet pans | Batch spacing, oven accuracy, midpoint turn | Longer preheat; pieces may finish unevenly |
| Air fryer | Small batch in a supported appliance | Basket capacity and early temperature checks | Models vary; crowded baskets cook poorly |
| Grill | Outdoor batch and direct browning | Hot zones, flare-ups, side-entry thermometer | Surface darkens before the centre is necessarily safe |
| Microwave | Only a product with microwave directions | Exact package power, arrangement, time, and standing step | Uneven heating; no safe generic raw-sausage method |
No method is “best” for everyone. The correct choice is the one you can execute with the product directions, clean separation, and a reliable thermometer.
Cooking breakfast sausage in a skillet
When the skillet is the right choice
A skillet suits a small number of fresh patties or links. It lets you see fat release, move pieces away from a hot spot, and turn them individually. It is less convenient for a large brunch because several batches may be required.
University of Maine Cooperative Extension’s turkey-apple sausage patties provide one documented skillet example: half-inch patties cook in a nonstick skillet and finish at 165°F. Its published time belongs to that specific turkey formula and thickness. Do not apply it automatically to frozen pork links or a thicker homemade patty.
Skillet workflow
- Read the package or complete recipe and identify the safe endpoint.
- Choose a pan wide enough for one layer with space between pieces.
- Apply cooking spray or fat only when the source calls for it. Many pork sausages release substantial fat.
- Heat the pan at the setting specified by the product or recipe; moderate heat is a cautious default only when no validated setting is supplied.
- Add sausage without crowding.
- Turn pieces as needed for even surface cooking.
- Begin checking the centre before the outside becomes excessively dark.
- Remove each piece at 160°F for ground red-meat sausage or 165°F for poultry sausage.
Do not press patties with a spatula. Pressing forces liquid and fat into the pan and does not accelerate heat through the centre in a controlled way. Do not puncture links repeatedly to “let grease out”; casing damage changes the result and is not a safety measure.
Managing rendered fat
If a deep pool develops, reduce crowding in the next batch. Keep the pan level and turn pieces carefully to avoid splashes. Do not pour hot fat into a sink or a container that is not heat-safe. Let it cool before disposal according to local practice.
Rendered fat can make later batches brown faster. Wipe or manage the pan only when it is safe, and do not mix raw drippings with cooked food.
Checking a thin patty
USDA advises inserting a thermometer probe through the side of a thin food until the sensing area reaches the centre. A top-down poke may leave most of a long sensor near the hot surface. Lift the patty onto a clean spatula if that makes side insertion safer. Clean the thermometer after touching undercooked meat.
For a link, approach from an end or side so the sensor is surrounded by the centre of the sausage rather than touching the pan. Check more than one piece because skillet hot zones and size variation matter.
Cooking breakfast sausage in the oven
When the oven is the right choice
The oven suits a full sheet of patties or small links and leaves stovetop burners free. It also contains most splatter on a rimmed pan. Preheating and batch layout matter more than with a skillet.
One recognized culinary method from 101 Cooking for Two uses 400°F for ordinary fresh breakfast patties or links, with a planning estimate of roughly 12 to 15 minutes and a turn near the midpoint. That is a source-specific starting method, not a universal promise. Package directions take priority, and internal temperature decides the finish.
Oven workflow
- Preheat fully to the package or source temperature.
- Use a rimmed sheet pan or shallow roasting pan that will contain fat.
- Line or rack the pan only when the selected method permits it.
- Arrange pieces in one layer without overlap.
- Bake, turning patties or rotating links near the method’s midpoint.
- Check multiple pieces from different pan zones.
- Remove finished pieces individually if sizes differ.
USDA guidance says ovens used to cook meat and poultry should be set at 325°F or higher. A low oven used as an improvised holding chamber is not a validated raw-sausage method.
Pan versus rack
Direct contact with a metal pan can produce stronger browning on the lower surface. A rack over a shallow pan exposes more of a link to circulating air and lets rendered fat fall below. Williams Sonoma documents a rack-based 400°F breakfast-link method, followed by optional browning.
The setups are not identical. A rack can reduce contact frying but adds equipment and may let small links roll. Parchment can simplify release but must be rated for the oven temperature and is often unsuitable under a broiler. Foil can contain fat but changes surface contact. Whichever setup you choose, use a rim and measure the food’s centre.
Two-pan batches
Two pans can block air and occupy different heat zones. Rotate front to back or upper to lower only when the method and oven allow it safely. Begin checking both sheets early. Do not assume the upper pan and lower pan finish together.
Cooking breakfast sausage in an air fryer
Decide whether the appliance supports it
Read the air-fryer manual and sausage package. Some products publish specific air-fryer directions; others do not. Basket style, power, capacity, and airflow vary enough that one online time cannot cover every model.
USDA FSIS applies the same safety framework to air frying: clean, separate, cook, and chill. Ground meat products need 160°F, while poultry, including ground poultry, needs 165°F. The agency also emphasizes that model and power differences affect cooking time.
Air-fryer workflow
- Confirm the product may be air fried from its current fresh, thawed, or frozen state.
- Preheat only if the manual or directions require it.
- Arrange pieces in one layer with space for air circulation.
- Keep fat below the appliance’s safe fill limits.
- Turn or shake only when the instructions call for it.
- Start thermometer checks before the suggested finish.
- Check several pieces, especially those near the basket edge or heating element.
Do not stack patties. Air must contact their surfaces, and stacked raw meat can shield cold areas. Do not line the basket in a way that blocks required airflow unless the manufacturer approves that accessory.
Fat and smoke control
Breakfast sausage can release fat that drips near a heating element. Clean old residue before cooking, do not overfill, and follow the appliance’s smoke-control and grease instructions. Stop if unsafe smoke, flare, or malfunction occurs.
An air fryer can brown quickly. A dark surface is not evidence that the centre reached 160°F or 165°F. Temperature remains the deciding measurement.
Cooking breakfast sausage on a grill
When grilling makes sense
A grill can handle a batch outdoors and gives strong direct-heat browning. It is a demanding method for small patties and links because pieces can fall through grates, fat can flare, and outside colour develops quickly.
Use a grill basket, griddle, or other accessory only if it is intended for the appliance and food. Keep raw and cooked platters separate. Set up heat zones so pieces can be moved away from intense flame while their centres finish.
Grill workflow
- Clean and preheat the grill according to its manual.
- Establish a controlled cooking zone and a cooler zone.
- Place sausage so it cannot roll or fall through.
- Turn with tongs or a spatula; do not stab repeatedly with a fork.
- Move pieces if flare-ups blacken the surface.
- Check the centre from the side with a thermometer.
- Transfer finished sausage to a clean platter.
USDA warns that grilled meat and poultry may brown quickly outside while remaining undercooked inside. Never partially grill sausage for completion later. Cook continuously to the applicable endpoint.
Flare-up decisions
Move sausage away from flames rather than spraying water onto a grease flare. Close or open the lid only as the grill manufacturer directs. Keep a safe distance and use long tools.
Charred areas do not make an under-temperature centre acceptable. If a piece is dark before safe, move it to indirect heat and continue monitoring. For the next batch, reduce heat intensity or increase the distance from flame.
Microwave cooking: only with exact product directions
Microwave ovens heat unevenly. Power ratings, piece arrangement, food mass, turntable performance, and standing time all change the result. This guide therefore does not invent a generic microwave process for raw breakfast sausage.
Use a microwave only when the package provides instructions for that exact product and state. Follow the listed wattage adjustment, covering, turning, rotation, and standing time. Then verify the applicable internal temperature in more than one piece or location.
Do not microwave raw sausage because a similar fully cooked product had microwave directions. “Heat and serve” directions are not raw-meat cooking directions. Do not skip the standing period when it is part of the validated process.
Fresh, frozen, and ready-to-eat decisions
Fresh refrigerated sausage
Keep it at 40°F or below until the pan, oven, basket, or grill is ready. Follow the fresh-product directions and cook continuously. The general skillet and oven examples in this guide apply only to source-matched fresh pieces.
Frozen raw sausage
Use package instructions that explicitly start from frozen. Thickness and formulation vary. If no validated frozen method exists, thaw safely in the refrigerator and then use a fresh method. Do not leave patties on the counter until they can be pulled apart.
Thawed sausage
Sausage thawed in the refrigerator can generally follow a fresh method, subject to the package date and instructions. Product thawed by microwave or cold-water methods may require immediate cooking under government guidance.
Ready-to-eat sausage
Follow heating directions for quality. Keep it separate from raw sausage, which can contaminate it. A ready-to-eat label does not mean the opened package can sit at room temperature indefinitely.
Plant-based breakfast products
These are not governed by ground-meat endpoints in the same way, and formulas vary. Follow the manufacturer’s instructions. Do not apply a pork timing chart or call a plant-based product safe merely because its exterior is hot.
Temperature guide
| Product | Minimum centre temperature |
|---|---|
| Raw sausage containing ground pork, beef, veal, or lamb | 160°F (71.1°C) |
| Raw sausage containing ground turkey or chicken | 165°F (73.9°C) |
| Mixed sausage containing poultry | 165°F (73.9°C) |
| Cooked leftovers being reheated | 165°F (73.9°C) |
| Ready-to-eat commercial sausage | Follow heating label; maintain safe handling |
These are US household safety values from USDA FSIS. They do not provide a cooking time, and they do not replace product directions for frozen or partially cooked items.
Thermometer technique by shape
Thin patty
Insert from the side so the full sensor reaches the centre. For a long dial probe, the sensing region can extend two to three inches; a top-down insertion in a half-inch patty cannot surround it properly. A thin-tip digital thermometer is easier to use.
Small link
Insert from an end or side into the centre line. Avoid pushing through to the pan or grate, which can give a falsely high reading. Test more than one link.
Thick patty or large link
Measure the thickest area and check several locations if the shape is irregular. Large sausage may need a different cooking method and longer time than breakfast pieces.
Probe care
Wash with hot, soapy water or follow the manufacturer’s instructions. Do not immerse a display or connection that is not waterproof. Clean after an under-temperature reading before inserting into a cooked piece.
Avoid cross-contamination
Open raw sausage over a cleanable work surface. Discard absorbent pads and packaging without dripping. Wash hands after handling the product and before touching refrigerator handles, spice containers, cooked bread, fruit, or serving dishes.
Use one tray for raw sausage and another for cooked sausage. Do not use raw-meat tongs at the table. Clean skillets, sheet pans, racks, baskets, grill tools, counters, and thermometer probes appropriately.
Do not rinse raw sausage. Water can splash contamination around the sink and nearby surfaces. Cooking to the proper internal temperature is the control step.
Cooking for a group
Choose the oven for a sheet-pan batch, a large griddle or several controlled skillet batches for close supervision, or a grill only when staffing and safety permit. An air fryer is often too small for a large group unless several sequential batches are planned.
Create a schedule from capacity:
- Count how many pieces fit without touching.
- Estimate the number of batches.
- Include preheat, turning, temperature checking, and recovery time.
- Plan safe hot holding or serve in waves.
- Keep pork and poultry labeled and physically separated if that matters to diners.
Do not pile newly cooked pieces onto older ones in an uncontrolled serving dish. Put out smaller quantities and replenish with a clean utensil. Maintain safe hot holding when service is prolonged.
For dietary or religious separation, use separate pans, tools, and platters. A shared thermometer can be cleaned between uses, but a quick wipe on a towel is not an allergen or sanitation protocol.
Common problems by method
Skillet: outside dark, centre below temperature
Reduce heat and use a pan size that avoids crowding. Make pieces uniform. Continue at controlled heat until the centre is safe; do not serve based on crust colour.
Skillet: patties break
Use a formula designed to bind, allow the first side to set, and support the whole patty with a spatula. Do not add an improvised raw egg or flour to commercial sausage.
Oven: pale surface
Verify preheat and oven accuracy, leave space, and use the pan setup in the method. If the centre is already safe, additional browning will continue cooking it. Broil only when the recipe, pan, liner, and appliance permit it.
Oven: sheet fills with fat
Use a rimmed pan, keep it level, and reduce batch density next time. Do not drain a dangerously hot pan over a sink while raw pieces remain on it.
Air fryer: one side cooks faster
Check basket loading, permitted liner use, and the manual’s turning instruction. Remove finished pieces and continue others. Do not extend the whole batch until the smallest pieces are dry.
Air fryer: smoke
Stop and follow appliance safety instructions. Clean prior residue, avoid overfilling, and manage rendered fat as the manual directs.
Grill: flare-ups
Move pieces to a cooler zone. Do not pierce links to drain them onto flame. Maintain control of the lid and vents according to the grill manual.
Microwave: cold spots
Confirm that the product supports microwave cooking, follow arrangement and standing directions, and measure multiple spots. If the label lacks raw microwave instructions, select another method.
Storage before and after cooking
FoodSafety.gov lists raw sausage made from chicken, turkey, pork, or beef at one to two days in a refrigerator at 40°F or below. Package dates and directions can be more restrictive. Freeze promptly if it will not be cooked within the safe window.
Cooked meat or poultry leftovers are generally listed at three to four refrigerated days. Cool and refrigerate within two hours under ordinary conditions. Use shallow containers or modest portions so food cools efficiently.
Label containers with the meat, cooked status, and date. Freeze portions that will not be used during the refrigerator window. Freezing pauses bacterial growth but does not repair unsafe handling that happened beforehand.
Reheat cooked leftovers to 165°F. A skillet may restore contact browning; an oven can handle several pieces; an air fryer may work when the appliance supports reheating; a microwave can be used with appropriate arrangement and checks. Reheat only what will be served.
Choosing the method in real situations
Two people on a weekday
Use a skillet for a few fresh pieces because preheating is short and individual control is high. Keep the rest of the raw package refrigerated or freeze it promptly within its safe window.
Eight people at brunch
Use an uncrowded rimmed sheet pan in the oven. If two pans are required, rotate and check both. Plan a clean serving platter and safe holding.
One small frozen commercial portion
Use the package’s frozen instructions. If it offers an air-fryer method, match the appliance settings. If it offers only oven directions, do not invent a shorter air-fryer conversion.
Outdoor breakfast
Use a grill only with stable equipment, separate raw and cooked zones, a cooler heat area, and a thermometer. Protect perishable raw sausage from warm outdoor conditions.
Fully cooked links before work
Use the package’s heating method, which may include microwave instructions. Do not apply raw-sausage time. Keep the opened remainder refrigerated.
Patties and links need different handling
A patty exposes a broad flat surface to a skillet, sheet pan, air-fryer basket, or griddle. That surface can brown rapidly while a thick centre lags. Keep patties in a single layer, turn them with a spatula that supports the disk, and insert the thermometer horizontally through the edge. If homemade patties vary in thickness, sort them before cooking and expect separate finish times.
A link has a curved surface and may roll toward a pan or grill hot spot. Turn it with tongs without squeezing or puncturing the casing. For a short breakfast link, insert a narrow probe from the end toward the centre line or from the side at its thickest point. Avoid pushing the sensor through to hot metal.
Do not flatten a commercial link into a patty or reshape a commercial patty unless its instructions permit it. Form changes alter thickness, casing integrity, heat transfer, and timing. If links and patties must be cooked for the same meal, use separate zones or pans and check each shape independently. Shared meat type does not make their finish times identical.
Final checklist
- Read the label before selecting the appliance.
- Separate raw, partially cooked, and ready-to-eat products.
- Match fresh or frozen state to the directions.
- Use one uncrowded layer.
- Control skillet hot spots, oven zones, air-fryer airflow, or grill flare-ups.
- Measure thin food from the side into the centre.
- Reach 160°F for ground red-meat sausage or 165°F for poultry sausage.
- Move cooked sausage to a clean platter.
- Refrigerate promptly and reheat leftovers to 165°F.
The skillet, oven, air fryer, and grill can all cook breakfast sausage successfully when the product fits the method. The most reliable approach is not memorizing one time; it is identifying the sausage, following its directions, managing the equipment, and measuring the centre correctly.
Explore related Pancakes World guidance on American Pancakes, Maple Syrup, and Maple Syrup Pancakes.
Sources and editorial references
- USDA FSIS: Sausages and Food Safety —
https://www.fsis.usda.gov/food-safety/safe-food-handling-and-preparation/meat-catfish/sausages-and-food-safety - USDA FSIS: Food Thermometers —
https://www.fsis.usda.gov/food-safety/safe-food-handling-and-preparation/food-safety-basics/food-thermometers - University of Maine Cooperative Extension: Turkey Apple Sausage Patties —
https://extension.umaine.edu/food-health/recipes/turkey-apple-sausage-patties/ - 101 Cooking for Two: How to Cook Breakfast Sausage in the Oven —
https://www.101cookingfortwo.com/cook-sausage-oven/comment-page-1/ - USDA FSIS: Air Fryers and Food Safety —
https://www.fsis.usda.gov/food-safety/safe-food-handling-and-preparation/food-safety-basics/air-fryers-and-food-safety - USDA FSIS: Food-safety campaign resources —
https://www.fsis.usda.gov/news-events/branding-toolkits - FoodSafety.gov: Cold Food Storage Chart —
https://www.foodsafety.gov/food-safety-charts/cold-food-storage-charts