Breakfast cupcakes
At Pancakes World, breakfast cupcakes are individual portions made in a cupcake or muffin-shaped cup; the name describes presentation, not one recipe or nutrition profile. They can be egg-based cups, baked oatmeal portions, pancake-style cakes, bread-lined cups, potato nests or small savoury bakes. Pick the structure before choosing fillings, because each one binds, rises, cools and releases differently. Use a complete recipe for quantities and timing, fill cups consistently, check egg dishes for safe temperature, and keep toppings separate when they would soften during storage.
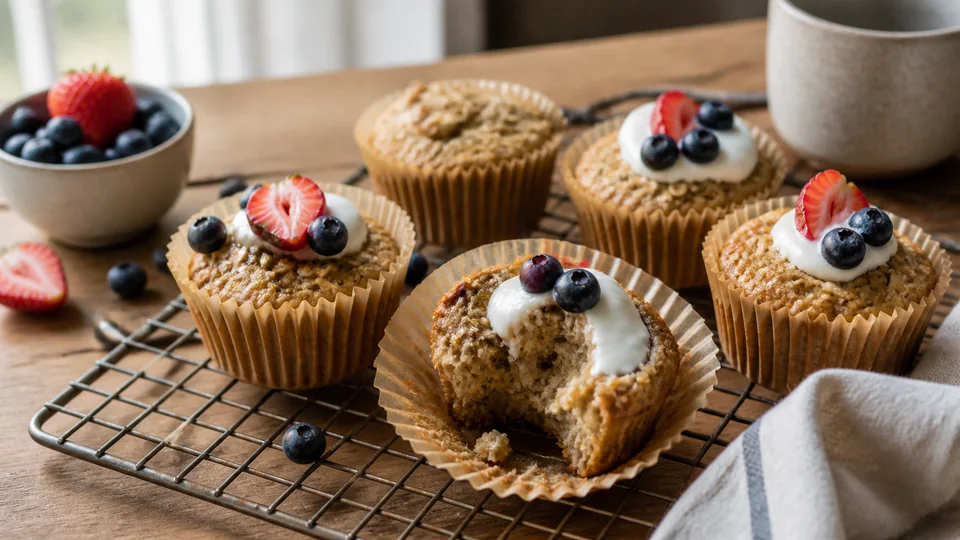
The Breakfast hub collects more formats. Pancake World is the main editorial index.
| Guide sections |
|---|
| First decide what “cupcake” means on your table |
| Egg-based breakfast cups |
| Baked oatmeal cups |
| Pancake-style breakfast cakes |
For broader context, continue with American Breakfast: Pancakes, Diner Plates and Brunch.
First decide what “cupcake” means on your table
Some readers picture a small sweet cake with frosting. Others mean an omelette-like portion baked in a muffin tin. A third group uses the term for oatmeal or pancake batter baked in individual wells. These foods share a silhouette but not a dependable master formula. Swapping one structure for another while retaining the same liquid, pan fill or bake time is likely to produce an unpredictable result.
Define the desired eating experience. Do you want a handheld warm portion, a fork-tender oat cup, a bread shell carrying a filling, or a small cake served with fruit? Decide whether it must travel, whether it will be reheated and whether diners need different fillings. Those answers narrow the appropriate recipe before any ingredients are purchased.
This page offers a format map and production decisions. It does not publish fixed quantities because no project-owned test record exists for a single breakfast-cupcake recipe. Each suggestion must be completed with a documented formula that specifies pan, ingredients, yield, method and timing.
Egg-based breakfast cups
An egg cup relies on coagulating egg to hold vegetables, cheese, cooked meat or another documented filling. The mixture must surround the additions; an overfilled well can become a pile of filling connected by too little egg. Ingredients that release water may need cooking or draining before they enter the cup, according to the selected method.
Cut additions to a size that distributes through an individual portion. Large pieces can make the cup break when lifted and cause one serving to receive most of an ingredient. Portion solid fillings among the wells first, then add the egg mixture as the recipe directs. This is easier to control than pouring a heavy mixture and hoping each scoop is equal.
Keep a clean rim around each well. Spilled egg can bake onto the tin and make removal awkward. A documented recipe should specify greasing, liners or another release method; paper liners suitable for cake batter do not necessarily behave the same way with egg.
FoodSafety.gov lists 160°F for egg dishes. Check the centre of representative cups with a food thermometer rather than treating colour or puffing as proof. The top may rise dramatically in the oven and settle during cooling; appearance alone is not a safety measurement.
Choosing additions for egg cups
Think in terms of moisture, size and readiness. A cooked, well-drained vegetable behaves differently from a raw watery one. Raw meat must never be added on the assumption that the short baking schedule will cook it safely; use only the state and method specified by a complete recipe. Cheese changes salt, moisture and release, so retain the formula's intended type or an explicitly documented substitution.
For a divided batch, establish one base mixture and prepare labelled filling bowls. Mark the rows on a paper diagram before filling. A different garnish on top can identify each variation, but do not rely on memory where an allergen distinction matters. Dedicated utensils and appropriate cross-contact controls are required for real allergen needs.
Baked oatmeal cups
Oat cups are portioned baked oatmeal rather than miniature egg dishes. Oats absorb liquid, and the final texture depends on oat form, rest, fruit moisture and binder. Use a recipe written for individual wells; simply moving a pan of oatmeal into a muffin tin changes exposed surface area and portion depth.
Stir the mixture immediately before portioning so heavier ingredients do not settle at the bottom of the bowl. Distribute visible fruit or nuts deliberately instead of letting the final wells inherit everything left behind. Fill each well to a similar level for more consistent baking.
An oat cup intended to hold in the hand needs a different finish from one meant to be eaten warm with a spoon. Let the recipe's cooling instruction determine when to unmould it. Pulling a tender cup out while steam is still softening its centre can cause it to split even when it is otherwise done.
Fruit choices in an oat structure
Fresh, frozen and dried fruit do not contribute the same amount of water. Keep the form specified by the source. If a recipe permits alternatives, choose within those alternatives and note the change. Large frozen pieces may cool the surrounding batter; very juicy fresh fruit can produce wet pockets; dried fruit can draw moisture. These are reasons to follow a documented formula rather than grounds for a universal conversion.
Wash fresh produce under running water and do not use soap, detergent or commercial produce wash, following FDA guidance. Drain or dry it as appropriate before it enters the mixture. Keep cut produce refrigerated until the preparation stage.
Pancake-style breakfast cakes
A pancake-style cup uses a pourable batter but bakes rather than cooking on a griddle. The oven format changes browning and prevents the cook from watching the same bubbles and edges used as griddle cues. Choose a formula specifically designed for the tin and oven rather than relocating an arbitrary pancake batter.
Small additions should be distributed after the batter is portioned if the recipe permits. This prevents berries or chocolate pieces from sinking to the mixing bowl's bottom. Do not overload the wells: additions occupy volume and can interfere with structure. Keep a portion plain when diners want to add toppings at the table.
Serve syrup, yoghurt, fruit sauce or other wet finishes separately when the cups will be packed. Pouring them on before storage changes the surface and makes handling messy. For a plated breakfast, a spooned finish can be added at the last moment so the cake remains recognisable.
Bread-lined breakfast cups
A bread cup uses a slice or piece of bread as an edible shell. The bread must fit into the well without tearing into an open channel. Trimming, flattening and overlapping belong to the selected method. An unsupported shortcut can let filling leak under the shell and glue it to the tin.
Choose a filling whose moisture and cooking state suit the bread. Thick cooked vegetables, an egg mixture in a tested proportion, or another documented filling may work. A very wet sauce can soak the base before the centre is ready. Pre-cooking the shell is appropriate only when the formula calls for it.
Bread cups are convenient for visible portioning. They are not automatically suitable for unrefrigerated travel when the filling is perishable. Pack them cold with suitable temperature control or serve promptly, following safe handling for their ingredients.
Potato nests and other crisp shells
A potato nest aims for a crisp outer structure that carries a separate centre. Grated potato releases moisture and can cling to metal, so preparation and pan treatment are central to the result. Use a recipe that specifies the potato state, draining or squeezing, seasoning, shell thickness and any initial bake before filling.
Pressing a very thick layer into the well can leave a heavy base while edges brown. A very thin or patchy layer can break. The correct thickness is a recipe variable, not a visual guess supplied here. Once shells are formed, avoid adding a filling wetter than the method anticipates.
Other vegetable shells require their own formula. A slice of squash, a shredded root vegetable and mashed potato have different water and starch behaviour. Similar appearance in a muffin tin does not make them interchangeable.
Savoury batter cups
Cornmeal, flour-based or mixed savoury batters can carry herbs, vegetables or cheese in an individual bake. Unlike an egg cup, the batter's flour, liquid and leavening create the crumb. Follow the source's mixing order: overworking some batters can change their texture, while insufficient mixing may leave dry pockets.
Treat added vegetables as part of the formula. Cooked corn, chopped herbs and a well-drained pepper are not equivalent in moisture or bulk. If the recipe provides a range or optional addition, stay within it. A refrigerator-clearing assortment belongs in a flexible documented bake, not in a recipe with an untested carrying capacity.
Sweet cake-shaped options
A breakfast cupcake can also be a lightly finished small cake served in the morning. The word “breakfast” does not produce a regulated nutrition profile, and omitting frosting does not establish one. Describe the food accurately: banana oat cake, apple spice muffin-cake or another actual formula is clearer than promising a better-for-you cupcake.
If frosting or glaze is part of the desired presentation, decide whether it can stand at the planned service temperature and whether the cake must be fully cool before decorating. For transport, a thin, set finish may be easier than a tall swirl, but the selected recipe should govern storage.
Fruit, spices and extracts provide different kinds of flavour. Fruit affects moisture and bulk; a spice or extract usually does not replace that structural contribution. Do not swap them merely because they share a flavour description on a menu.
Match the cup to the occasion
Sit-down breakfast
A tender oat cup or warm pancake-style cake can be plated with fruit and a wet accompaniment. It does not need to survive a commute, so texture can be softer. Plate after a short cooling period as the recipe specifies and bring finishes to the table separately.
Packed morning
Choose a structure documented to hold after cooling. Keep perishable portions refrigerated and use appropriate cold transport. Avoid loose sauce and tall garnishes. Wrap only after the cup is cool enough that trapped steam will not soak the surface.
Shared brunch
Offer two clearly different types rather than many nearly identical fillings. For example, one egg-based tray and one oat-based tray give guests a meaningful choice and make labels manageable. Put a card beside each platter listing its name and relevant ingredients.
Breakfast for children
Select size, texture and ingredients for the actual child and supervision context. The cupcake shape does not remove choking or allergen considerations. Avoid medical or developmental assumptions; caregivers should make the individual decision.
Choose the right equipment before mixing
Inspect the recipe's pan specification. Standard muffin tins, mini tins, jumbo wells and silicone moulds produce different depths and exposed surfaces. A bake time written for one cannot be transferred automatically to another. Dark and light metal can also behave differently; retain the source's cues and verify doneness appropriately.
Count the usable wells. A damaged or badly scratched pan may complicate release. If using two tins, decide whether both fit on one oven rack with air space. Rotating pans is not automatically required; follow the formula and understand whether opening the oven could affect a rising batter.
Use a portioning tool that fits the mixture. A ladle suits a fluid egg base, while a scoop can handle oat or cake batter. Solid fillings may be placed by hand with clean utensils before liquid is added. The goal is equal depth, not merely equal-looking tops.
Liners must match the preparation. Paper, parchment, silicone and greased bare metal release differently. A recipe written for one approach may depend on it. Do not add a decorative paper wrapper to a hot, moist cup unless it is food-safe for that use.
A production sequence for consistent portions
Read the recipe through and identify anything that needs cooking and cooling before assembly. Prepare those ingredients first. Next, ready the pan and set out a cooling rack or tray. Divide fillings if variations are planned, and label their positions.
Mix the binding base only when the oven and pan are ready. Some batters should not wait after leavening is activated; an egg mixture can settle around heavy additions. Portion in a repeatable order, moving across the tin row by row. Stop to redistribute the main bowl only as the formula allows.
Clean the rims and check that wells have comparable fill levels. Place the tin as directed. Use the recipe's time as a checkpoint, then assess its stated visual or tactile cues and any required safe internal temperature. Never use a photograph as the only doneness test.
After baking, follow the prescribed rest. Run an appropriate tool around edges only if the release method calls for it, taking care not to damage the pan. Move portions to a rack or serving plate so trapped steam does not collect beneath them.
Planning variations without losing control
Create a base-and-zone plan. Divide the wells into two or three zones on paper, then assign one variation to each. Keep the base identical only if the documented formula permits those additions. Put ingredients into the wells before pouring the binder when that helps equal distribution.
Choose variations that are visually distinguishable. Herbs, a visible fruit piece or a clearly different topping can identify a zone, but an allergen-critical difference needs more than a visual marker. Use separate tools, prevent cross-contact and label finished food accurately.
Limit each variation to one meaningful change. Spinach and herb versus pepper and cheese is easier to understand than six unique wells. It also helps the cook observe whether one addition releases moisture or changes release without pretending the batch is a formal test.
Record the source recipe and optional variation used. An informal kitchen note can say “row one used the listed spinach option.” It should not say “perfected” or “tested by Pancake World” because no project-owned test record supports that claim.
Release and texture problems
The cups stick
Confirm that the pan preparation matched the method and that the cups rested for the specified period. Trying to remove them immediately can tear a tender structure; leaving some foods in the tin too long can also trap moisture. Do not compensate by coating the next batch with an arbitrary amount of fat.
Egg cups weep liquid
Review the moisture and readiness of vegetables or other fillings. Check whether substitutions exceeded the source's allowance and whether the cups reached the applicable safe temperature. Drain or pre-cook only as a credible formula instructs.
Oat cups crumble
Check oat form, binder, portion depth and cooling. Cutting or lifting before the structure sets may be the cause. Do not add extra liquid without understanding whether the recipe needs moisture or more cooling time.
Cake cups dome unevenly
Compare fill levels and pan position. Heavy additions may have settled into certain wells. Measure portions more consistently next time and distribute additions after portioning when the formula permits.
Bread shells turn soggy
Look at filling moisture and the delay before baking or serving. Drain the filling as specified and avoid assembling far earlier than the source allows. A wet garnish may be better added after the shell leaves the oven.
Cooling, refrigeration and reheating
Perishable breakfast cups should be refrigerated within two hours. USDA FSIS recommends shallow containers so leftovers cool promptly and says most refrigerated leftovers are used within three to four days. Label the container with the product and date.
Do not pack a deep container tightly with steaming cups. Arrange them in a shallow layer or use an appropriate cooling plan so heat can leave. Once chilled, separate layers if needed to protect the surface, and keep the lid closed in refrigeration.
Reheat leftovers and casseroles to 165°F. Check the centre of a representative portion because the outside can become hot first. A microwave may heat unevenly; arrange portions with space and allow the documented standing time when relevant.
Some cake-like or oat products may have different storage instructions depending on their ingredients. Follow the selected recipe. The presence of eggs, dairy, moist fruit or a perishable frosting can change handling, so do not infer room-temperature storage from shape alone.
Freeze only when the complete method supports it. Cool first, wrap and label individual portions, and use a thawing and reheating plan suited to the structure. A frozen crisp shell may not return to its original texture; decide whether convenience or texture matters more for that batch.
Packing a breakfast cup
Choose a container that prevents crushing and contains crumbs or moisture. Place wet sauce in a sealed separate cup. If the portion requires refrigeration, use suitable cold holding through the trip and at the destination. A paper bag alone is not temperature control.
Pack a utensil when the cup is tender or served with yoghurt or fruit. Add a napkin and a clearly labelled accompaniment. Remove decorative picks before eating and do not use non-food-safe craft decorations.
For multiple people, label names or ingredient differences on the outside. Do not rely on wrapper colour if the distinction affects an allergen or dietary requirement. The safest approach is to avoid cross-contact at preparation and maintain accurate identity through service.
Presentation without dessert confusion
Use a flat platter for savoury cups and leave enough space to pick each one up. A small herb finish or visible ingredient can indicate flavour. Put cold garnishes in their own bowls so heat does not wilt them and diners control the final assembly.
For sweet versions, a dusting, fruit piece or spooned accompaniment can make the format clear without building a tall frosting swirl. If frosting is the point, call it a frosted breakfast cake and follow the recipe's storage instructions rather than suggesting the morning label changes the food.
Name each item by its structure and main flavour: egg and pepper cup, baked oat cup with apple, bread cup with beans, or pancake-style berry cake. Specific names set useful expectations and reduce the need for claims such as healthy, guilt-free or protein-packed.
Reading labels for mixes and packaged ingredients
When using a baking mix, tortilla, bread, cheese or other packaged component, read its preparation and storage directions. FDA explains that the Nutrition Facts panel lists serving size and servings per container; the amount you use may not equal one labelled serving.
Do not calculate a finished cup's nutrition by copying one package number. The final food may include several ingredients and a different yield. An accurate calculation would require exact quantities, forms, retained amounts and portions. No such calculation is presented here.
Check ingredient statements and allergen information on each current package. Similar-looking products can differ. Retain the label until finished portions are identified and stored.
Questions before selecting a recipe
Does the method specify the exact tin size? Is the yield stated in individual cups? Are ingredients listed by form, such as cooked and drained rather than simply “vegetables”? Does the method explain when fillings enter? Are visual cues accompanied by a safe temperature where eggs are involved? Does it state a resting and release procedure? Are refrigeration and reheating addressed for make-ahead claims?
A recipe that answers these questions is easier to execute than a short social caption. If critical information is missing, choose a more complete source instead of filling gaps with assumptions.
Frequently asked questions
Are breakfast cupcakes the same as muffins?
Sometimes the label is used for a muffin-like cake, but it also covers egg cups, oat portions, bread shells and other individual bakes. Read the structure and method rather than relying on the name.
Can I pour any omelette mixture into a muffin tin?
Use a formula designed for the pan. Filling moisture, egg proportion, well depth and release method matter, and egg dishes must meet the applicable 160°F safety target.
How far ahead can I make them?
That depends on the specific ingredients and recipe. Refrigerate perishable portions within two hours, follow the documented storage method, and use most refrigerated leftovers within three to four days.
Can different flavours bake in one tin?
Yes when the base recipe permits the additions. Map zones, keep fill levels comparable, use distinct utensils where needed and label the finished types. Do not improvise changes that alter the structural ratio.
What is the best liner?
There is no universal liner. Follow the recipe's tested release method for its egg, oat, bread, potato or cake structure and the pan material being used.
Why is this page not marked as a Recipe?
It compares several cup-based breakfast formats. No single project-owned tested record supplies fixed ingredients, instructions, timing and yield, so Article schema is the accurate choice.
Keep one batch record
Write the recipe source, pan type, yield, variation zones and storage date on one sheet. Note factual observations after service: release was clean, a filling sank, or a wet topping softened the surface. Avoid superlatives and do not turn the note into a formal testing claim.
On the next batch, change only what the documented recipe permits. A restrained record helps reproduce a successful breakfast cup and exposes where a substitution moved beyond the source. It is more useful than treating every food baked in a muffin well as the same recipe.
Explore related Pancakes World guidance on American Pancakes, Maple Syrup, and Maple Syrup Pancakes.
Sources and editorial references
- FoodSafety.gov —
https://www.foodsafety.gov/food-safety-charts/safe-minimum-internal-temperatures - USDA Food Safety and Inspection Service —
https://www.fsis.usda.gov/food-safety/safe-food-handling-and-preparation/food-safety-basics/leftovers-and-food-safety - U.S. Food and Drug Administration —
https://www.fda.gov/food/buy-store-serve-safe-food/selecting-and-serving-produce-safely - U.S. Food and Drug Administration —
https://www.fda.gov/food/nutrition-facts-label/how-understand-and-use-nutrition-facts-label