Bake breakfast sausage
At Pancakes World, to bake ordinary fresh breakfast sausage, first follow any cooking directions on the package. When none are supplied, a practical source-backed starting method is to heat the oven to 400°F, arrange fresh patties or small links in one uncrowded layer on a rimmed sheet pan, turn them around the midpoint, and begin checking near 12 minutes. Remove each piece only when a correctly placed thermometer reads 160°F for sausage made from ground pork, beef, veal, or lamb, or 165°F for turkey or chicken sausage. Time and browning alone cannot confirm safety.
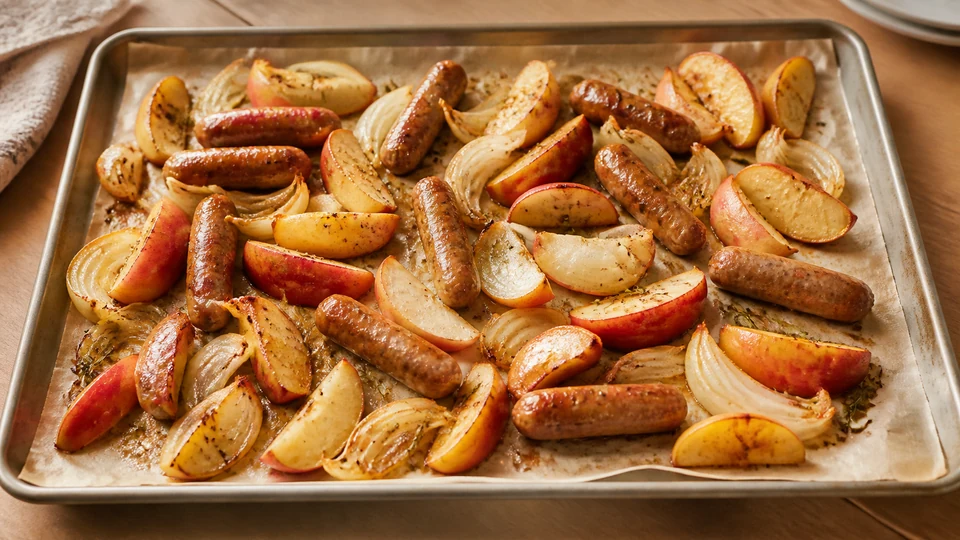
This focused guide covers the oven workflow, not homemade sausage seasoning. For other morning cooking formats, use the breakfast hub; the wider Pancake World collection connects the rest of the site.
For broader context, continue with American Breakfast: Pancakes, Diner Plates and Brunch.
Direct answer: oven temperature, time, and endpoint
For fresh, standard-size breakfast patties or links, 400°F for roughly 12 to 15 minutes is a useful initial estimate documented by 101 Cooking for Two. Turn patties or rotate links near the midpoint and start temperature checks before the estimated finish. The actual endpoint is 160°F for ground red-meat sausage or 165°F for ground-poultry sausage under USDA FSIS guidance.
Do not use that estimate for frozen patties, large Italian sausages, brats, thick homemade portions, or ready-to-eat links without checking their own instructions. Size, shape, meat, starting temperature, pan, oven accuracy, and air circulation all affect time. If a package provides validated oven directions, those directions define the starting oven setting and process; the applicable safe internal temperature still verifies raw sausage.
Before turning on the oven: identify the sausage
The word “sausage” does not tell you whether a product is raw, partially cooked, or ready to eat. USDA FSIS explains that sausage may be made from red meat, poultry, or a combination, and labels on products that still require cooking can include phrases such as “uncooked,” “cook before eating,” or “needs to be fully cooked.”
Read the principal display panel, safe-handling statement, ingredients, and cooking directions. Make four decisions:
- Is it raw or ready to eat?
- Is it pork or another red meat, poultry, or a mixture?
- Is it fresh, refrigerated, thawed, or frozen?
- Is it a thin patty, a small breakfast link, or a larger sausage?
These answers determine which directions and temperature apply. A browned, smoked-looking exterior does not prove that a product is ready to eat. A poultry sausage does not use the lower red-meat endpoint. A frozen patty does not automatically follow the fresh-patty clock.
The basic fresh-sausage sheet-pan method
1. Preheat fully
Place a rack in the middle area of the oven unless the package or source directs otherwise. Preheat to 400°F for the general fresh breakfast-sausage method. Let the oven reach temperature before the pan goes in.
USDA advises an oven setting of at least 325°F when cooking meat and poultry. A very low oven is therefore not an appropriate shortcut for slowly warming raw sausage. If you suspect the oven runs hot or cold, use a separate oven thermometer. USDA notes that oven thermostats cycle and that an appliance thermometer can reveal a consistent offset.
Convection can cook and brown differently from a conventional oven. Use a convection setting only when the product or selected recipe accounts for it, or monitor earlier and carefully. Do not assume the displayed temperature produces identical heat in every appliance.
2. Choose a rimmed pan
Use a rimmed sheet pan or shallow roasting pan that can contain rendered fat. A flat, rimless sheet creates a spill and burn risk. The pan must be large enough for one layer without pieces touching.
For direct-pan baking, use the surface treatment supported by the recipe or product. Parchment rated for the selected temperature may simplify release; foil can simplify cleanup but may change browning. Do not let paper extend into a heating element or broiler zone.
A rack placed inside a shallow pan is another documented method. Williams Sonoma’s baked breakfast sausage recipe uses a rack so links sit above rendered fat. A rack can increase air exposure and reduce contact frying, but it also adds cleaning and may produce a different surface texture. Either arrangement still requires temperature measurement.
3. Arrange one uncrowded layer
Place patties flat. Set links parallel or with enough space to turn them. Do not pile or overlap. Crowding traps steam, reduces browning, complicates turning, and makes individual pieces finish at different times.
If a package contains more sausage than the pan can hold comfortably, use two pans with attention to rack positions and rotation, or bake in batches. Two crowded pans are not equivalent to one correctly spaced pan. If using two racks, expect the upper and lower sheets to behave differently and verify individual pieces.
Keep pieces as similar in size as the package provides. Do not flatten commercial patties unless the instructions say to; changing thickness changes timing. Do not pierce links merely to release fat because holes can lose juices and are unnecessary for temperature checking.
4. Bake and turn
Place the pan in the preheated oven. For typical fresh breakfast pieces at 400°F, use 12 to 15 minutes only as a planning estimate. Turn patties or rotate links around the midpoint using tongs or a spatula.
Opening the door releases heat, so organize the turn efficiently. Do not leave the pan on the counter while arranging other food. Return it to the oven promptly.
The midpoint turn encourages more even contact and browning. It does not guarantee even internal temperature; edge pieces, smaller patties, and areas near a hot spot may still finish first.
5. Check internal temperature correctly
Begin checking before the expected finish so the sausage is not baked far beyond its safe endpoint. For a thin patty, USDA instructs inserting the probe from the side until the entire sensing area reaches the centre. A shallow top-down insertion may read mostly surface temperature.
For a small link, insert into the centre of the thickest part without pushing through to the hot pan. With very short links, approach from the end or side so the sensing region is surrounded by food. Consult the thermometer manufacturer to understand where its sensor is located.
Check pieces in different areas of the pan. If one is below target, return it to the oven and check again after a short interval. Clean the probe after raw or undercooked contact and before testing a cooked piece.
Use these USDA endpoints:
- raw sausage containing ground pork, beef, veal, or lamb: 160°F (71.1°C);
- raw sausage containing ground turkey or chicken: 165°F (73.9°C);
- a mixture containing poultry: use 165°F;
- reheated cooked leftovers: 165°F.
6. Remove finished pieces
Transfer cooked sausage to a clean platter. Never reuse the raw package tray or the plate that held uncooked patties. If pieces finish at different times, remove the ones at temperature and continue baking the rest rather than drying the entire batch.
Resting briefly can reduce surface sizzling and make handling easier, but it does not replace reaching the safe endpoint. Serve promptly or move to safe hot holding.
Patties versus links
Breakfast patties
Patties usually provide a broad contact surface and a thin centre. They can brown strongly where they touch a metal pan. Uniform thickness is the main variable; a patty with a thick centre will take longer than a flat commercial disk.
Turn with a spatula that supports the patty. Tongs can squeeze or break a soft homemade patty. For temperature, insert the probe sideways through the edge into the centre.
Small breakfast links
Links expose more curved surface to oven air. On a flat pan, the contact strip may brown more than the upper curve. Rotate with tongs so another surface meets the pan, or use a rack-based source method.
Do not puncture the casing before baking. A natural or edible casing may split as the sausage expands, especially at high heat, but intentional holes are not a safety step. The thermometer opening near the end of cooking is sufficient.
Larger links and brats
Large sausages have a longer path to the centre and cannot be assigned the 12-to-15-minute breakfast estimate. Use their package or a complete recipe written for their size. The same species-specific temperature rules apply to raw ground meat, but the process and timing will differ.
This page does not convert large dinner sausage into breakfast sausage based on time of day. Product identity, diameter, ingredients, and instructions matter.
Fresh, thawed, and frozen sausage
Fresh refrigerated pieces
The 400°F method above is intended for ordinary fresh breakfast patties or links. Keep them refrigerated until the oven and pan are ready. Do not let them warm on the counter to “cook faster.”
Safely thawed pieces
Sausage thawed in the refrigerator can generally be treated as fresh for the selected recipe, subject to package instructions and storage dates. If thawed by microwave or cold-water methods, current government guidance may require immediate cooking.
Frozen pieces
Use validated package directions for frozen sausage. Frozen commercial patties vary in thickness and may be raw, partially cooked, or fully cooked. A blog’s fresh-sausage estimate is not a replacement for the label.
Do not lower the oven and extend time by guesswork. Do not assume a frozen piece is done because the surface is dark. If the label permits oven cooking, arrange as directed and verify the required centre temperature.
Homemade frozen patties
Use a complete recipe that states whether patties can be cooked from frozen. Otherwise thaw them safely in the refrigerator before applying a fresh-sausage method. Stacked frozen patties must be separated without unsafe counter thawing or force that damages the packaging.
Raw versus ready-to-eat
Ready-to-eat sausage has already received a validated cooking process, but it still has product-specific heating and storage directions. Some ready-to-eat links may be served cold; others are designed to be heated for quality. Follow the label.
Partially cooked sausage can look ready. USDA requires prominent statements on products that still need consumer cooking. Treat “cook before eating” as raw from the household workflow perspective: prevent cross-contamination and reach the label/USDA endpoint.
Do not combine raw and fully cooked links on the same sheet. The raw pieces can contaminate the ready-to-eat ones, and they may require different times. Use separate pans, utensils, and plans.
Pan setup comparison
| Setup | Expected effect | Main caution |
|---|---|---|
| Bare or lightly treated rimmed metal pan | Strong lower-surface browning | Sticking and hot rendered fat |
| Parchment-lined rimmed pan | Easier release and cleanup | Verify temperature rating; may reduce direct browning |
| Foil-lined rimmed pan | Contains fat and simplifies cleanup | Shiny/dull surface and folds affect contact |
| Rack over shallow pan | More air exposure and less fat contact | More equipment; links can roll; still check temperature |
| Two pans on two racks | Higher batch capacity | Uneven oven zones; rotate and check multiple pieces |
No setup is universally superior. Choose according to the product directions, the desired surface, and safe fat containment.
Why there is no single baking time
Two sausage packages with the same weight can contain different numbers of pieces. Fewer pieces are usually thicker. A poultry patty and a pork link may have different fat, water, binders, casing, and required endpoint. Refrigerated and frozen products begin at different temperatures.
Ovens also vary. The displayed setting is an average controlled by cycles, not a constant exact air temperature. Dark sheet pans absorb heat differently from shiny pans. Convection moves air. Crowding adds steam. Opening the door slows recovery.
For all these reasons, time is a scheduling tool. The combination of product instructions and internal temperature makes the actual decision.
Browning without confusing it with safety
If sausage reaches its safe temperature but is lighter than desired, first confirm the source allows additional browning. A brief return to a hot oven can darken the surface, but it also continues cooking the centre.
Some culinary methods use a broiler at the end. Williams Sonoma documents broiling baked links for browning, but a broiler demands close attention: rendered fat can smoke, parchment may not be broiler-safe, and the distance from element to food matters. Use only a broiler-safe pan setup, keep the door position specified by the appliance, and never walk away.
Do not broil raw sausage as a shortcut unless a complete method is written for it. Strong surface radiation can brown the exterior well before the middle is safe.
Prevent smoke, splatter, and spills
Use a rimmed pan large enough to hold rendered fat. Do not pour water into hot grease. Keep the oven floor and heating elements clean from previous spills, because old residue can smoke before the sausage does.
Very fatty sausage or a crowded pan may release more liquid. Carefully remove the sheet with two dry oven mitts and keep it level. Set it on a heat-safe surface. Do not carry it over children, pets, or clutter.
Allow rendered fat to cool before disposal. Do not pour it down a drain. Follow local waste practices and the pan-liner manufacturer’s instructions.
Food-safety workflow
Keep raw sausage at 40°F or below until preparation. Wash hands after touching the package or meat. Use separate utensils and surfaces for ready-to-eat foods. Clean any refrigerator handle, oven control, or spice container touched with contaminated hands.
Do not rinse sausage; splashing can spread contamination. Do not partially bake it in the morning and finish it hours later. Cook continuously to the correct endpoint.
After cooking, USDA/FoodSafety.gov storage guidance lists cooked meat and poultry leftovers at three to four days refrigerated at 40°F or below. Refrigerate within two hours under ordinary conditions. Freeze earlier if they will not be eaten within that window.
Reheat leftovers to 165°F. Oven reheating can restore some surface texture, but the pieces may dry if held long after the centre reaches temperature. Reheat only the amount needed.
Batch cooking for brunch
Estimate capacity from pan area rather than package weight. Every piece needs space and every pan needs a route in and out of the oven. Preheat before guests arrive, label pork and poultry separately, and keep raw trays away from serving platters.
When two pans bake at once, rotate front to back and upper to lower only if the selected method and oven allow safe handling. Expect different finish times. Temperature-check several pieces from both sheets.
For continuous service, bake smaller waves. Put out a limited quantity, keep finished sausage under safe hot holding, and refill with a clean utensil. Do not top a nearly empty platter with raw or undercooked pieces.
If dietary or religious separation matters, use separate lined pans, tongs, thermometers after cleaning, and labeled platters. Visual differences are not a reliable identification system.
Troubleshooting oven-baked breakfast sausage
The outside is dark and the centre is below temperature
The oven may be too hot, pieces too thick, or pan too close to the element. Verify oven accuracy, use the middle rack, and choose product directions written for the size. Do not serve based on colour.
The sausage is pale
Crowding, a lined pan, a rack, or a cool oven may reduce contact browning. Confirm the oven temperature with an appliance thermometer and leave space. Once the centre is safe, use only a documented, broiler-safe finishing method if more colour is important.
Patties stick
Use the surface treatment allowed by the recipe, preheat properly, and allow the first side to set before turning. A thin flexible spatula helps. Do not pour extra oil into a pan already collecting sausage fat unless the source instructs it.
Links split
High heat, extended cooking, tight casings, or punctures can contribute. Use source temperature and check the centre early. A split casing is a quality issue; it neither proves nor disproves safety.
The pan fills with liquid
Use a larger rimmed pan and avoid crowding. Confirm that the product is intended for oven baking. Do not drain a dangerously hot sheet over the sink mid-cook; remove pieces safely and manage cooled fat afterward.
Different pieces finish at different times
Sort by size before cooking, space evenly, rotate the pan, and measure several locations. Remove finished pieces to a clean platter and return the rest. Do not sacrifice the smallest pieces while waiting for the largest.
Make-ahead and leftovers
For the least morning work, bake sausage fully in advance, cool it promptly, and refrigerate portions. On the serving day, reheat only what is needed to 165°F. This is safer than partially baking raw sausage and completing it later.
Label containers with product type and date. Keep pork, poultry, raw, and cooked packages unmistakable. FoodSafety.gov lists raw sausage made from chicken, turkey, pork, or beef at one to two days refrigerated and cooked leftovers at three to four days. Package dates or manufacturer instructions may be shorter.
Frozen cooked sausage is useful for longer planning, but freezer recommendations concern quality when food stays continuously frozen. Thaw under refrigeration or use a validated reheating method. Texture after freezing may be firmer; do not undercook the original batch to compensate.
Final oven checklist
- Read the package: raw, partially cooked, or ready to eat; meat type; fresh or frozen.
- Use package oven directions when provided.
- For an unlabelled ordinary fresh breakfast piece, 400°F and a 12-to-15-minute estimate is a source-backed starting point, not a guarantee.
- Use a rimmed pan and one uncrowded layer.
- Turn patties or rotate links near the midpoint.
- Insert the thermometer through the side of a thin piece into the centre.
- Reach 160°F for ground red-meat sausage or 165°F for poultry sausage.
- Transfer to a clean platter.
- Refrigerate leftovers promptly and reheat to 165°F.
Baking is valuable because one pan can handle a group while the stovetop remains free. Its success depends on correct product identification, spacing, an accurate oven, and a thermometer—not on one memorized number of minutes.
Explore related Pancakes World guidance on American Pancakes, Maple Syrup, and Maple Syrup Pancakes.
Sources and editorial references
- USDA FSIS: Sausages and Food Safety —
https://www.fsis.usda.gov/food-safety/safe-food-handling-and-preparation/meat-catfish/sausages-and-food-safety - USDA FSIS: Food Thermometers —
https://www.fsis.usda.gov/food-safety/safe-food-handling-and-preparation/food-safety-basics/food-thermometers - USDA FSIS: Appliance Thermometers —
https://www.fsis.usda.gov/food-safety/safe-food-handling-and-preparation/food-safety-basics/appliance-thermometers - 101 Cooking for Two: How to Cook Breakfast Sausage in the Oven —
https://www.101cookingfortwo.com/cook-sausage-oven/comment-page-1/ - Williams Sonoma: Baked Breakfast Sausages —
https://www.williams-sonoma.com/recipe/baked-breakfast-sausages.html - FoodSafety.gov: Cold Food Storage Chart —
https://www.foodsafety.gov/food-safety-charts/cold-food-storage-charts